Got an interesting invitation to a Christmas par;ty recently. It was a beautiful invitation with a difference.
The starting time was 10 am. Different than the usual 7 or 8 pm of most Christmas parties.
The invitation has a list of things to bring as well as homework assignments to complete. It also had an enclosure explaining where to find more information.
There wasn't a hint of donating to charities or buying something the host was selling.
This is a party for us. It is a party to expand one's mind. It is a party to grow one's expertise in making crafts that perhaps we have never made before.
I can hardly wait !!!
Friday, December 2, 2011
Thursday, December 1, 2011
More Bokeh (Update)
From what I have read on the Web, the canvas for bokehs is the out-of-focus areas usually behind the object in focus. Until I can solve the depth of field problem with my point and shoot (P&S), I will consider the canvas for bokehs to be any out-of-focus areas.
Lenses in P&S cameras are not designed to do good bokehs. They are designed to make all of the picture in focus.
Here are several ways to get an out-of-focus canvas:
Lenses in P&S cameras are not designed to do good bokehs. They are designed to make all of the picture in focus.
Here are several ways to get an out-of-focus canvas:
- Set the P&S camera to "aperture-priority" or AV at the biggest opening - the lowest number. If the camera doesn't have this setting, use a "macro" or "portrait" mode.
- If the camera has the ability to control the ISO or low sensor sensitivity, set it at the lowest possible setting to get as much light reflection as possible. Experiment with using a tripod.
- Pick a small object with lots of texture in the foreground to focus on. Hold the camera as close to this object as possible. Turn off the flash
- Make sure the background is far away from the object. Make sure the background has lots of reflective or light sources (Christmas lights are good).
- Press the shutter down half way to get the camera to focus on the small object. When it is in focus, snap the picture. View the picture on the LCD making sure the object is in focus and the background is out of focus.
- If the P&S has a zoom feature, zoom in all the way and take another picture. Compare the two.
Wednesday, November 30, 2011
Christmas Lights and Weird Camera Settings
On my way to do Bokeh with my point and shoot, I wanted to experiment with different settings on my camera. Here's a local barn decorated with holiday lights that I used for last night's experimentation.
 |
| normal setting |
 |
| weird setting #1 |
 |
| weird setting #2 |
 |
| weird setting #3 |
Monday, November 28, 2011
Bokehs
Surfing the web recently and came across some very colorful pictures using Bokeh effects. Many were done with very expensive cameras - yet there were a few done with a point--and-shoot like mine.
Since I like the unusual and colorful and could use my current equipment, I was intrigued.
I would love to show you some of their work, but they are protected behind fire walls. Hence, the url to find forty Bokeh photographs. Another link is Yahoo's collection of Bokeh photographs.
There seems to be some disagreement about the Bokeh effect. For my money (whatever that's worth), I see it as unfocused light sources. Some people have taken it steps further and created Bokeh paintings and Bokeh videos.
Since people are putting up their Christmas decorations, I thought would be a great time to document the Bokeh effect with my camera.
Wednesday, November 16, 2011
Cake-Decorating Week
Back in September, I signed up for a cake decorating class as I wanted to learn to decorate cookies. Last week, I happened to catch The Barefoot Contessa on the Food Network when she had a guest who specializes in decorating dog-shaped cookies. I want to do that for all-things western.
Since this class is compressed into one week, we haven't had to bake cakes and decorate them from scratch The others in the class - a grandmother, her daughter-in-law and her three teenaged grandchildren liked cookies, so it worked out well for me, too.
Because I had other commitments, I got to the store late, and they were out of sugar cookies - my first choice. So I bought some chocolate graham crackers instead. I will get to the store earlier next time, I promised myself.
At the class, I bought some of Wilton's Betty Crocker Chocolate icing. The dark brown chocolate graham crackers and the dark brown icing gave my hearts, balloons, "Happy Birthday" message, a snake, a southwestern sun, shells, stars, etc. a real western flair.
After sampling my artwork, I decided to skip the sugar cookies. Instead I ♥ chocolate graham crackers with chocolate icing.
When I am ready to make and decorate my own cookies, I will cut out boots, small railroad engines and the letters of the alphabet with my own cutters. I can't wait to see how they will ice up.
Monday, November 14, 2011
Craft Fairs
I love to go to craft fairs to talk to crafters (they are such neat people), see what they've made and how they display their products.
Here's a display in Golden recently that gave me a chuckle. I don't know if someone stole grandma's walker or whether grandma made these purses and someone kidnapped her. Either way, I let my imagination run wild.
Whatever the story, it was a very creative use of a walker. The peg board was secured to the walker with tie straps, and the red balloons drew attention to the "Pretty Purses" for sale at $45.00. There was even an extra purse behind the sign to re-stock the inventory.
You go, granny.


Friday, November 11, 2011
Basic Easy Peasy Burlap Tote
Here's the 411 on making the last posting's tote:
It takes less than a yard (mine took 26 inches) for the lining and a yard of belt backing for the strap. Beware, don't cut the burlap as it unravels big time. I pin my projects consistently (pins pointing inward from the seam) as it saves me from sticking myself and hunting for pins.
Step 1:
The tote I used is 13.5x20.5 inches. Rip or cut lining from your scraps the same size. Lining
is pretty forgiving.
Step 2:
Rip or cut pocket (same or different scrap) three or four inches less in height and width of you tote. If you don't have that big of scrap, cut two half the size and sew them together to make the correct-sized piece.
Step 3 (pocket):
Pin pocket together muted side in like picture below.
Step 4 (pocket to lining):
Pin three sides of muted pocket to muted side of lining making sure there is a good allowance at side and bottom edges. Sew pocket to lining leaving top open. Sew over easy, peasy seam at bottom.

You're ready to go anywhere, Cowgirl.
Let me know how yours turned out or where I need to make the directions clearer.
It takes less than a yard (mine took 26 inches) for the lining and a yard of belt backing for the strap. Beware, don't cut the burlap as it unravels big time. I pin my projects consistently (pins pointing inward from the seam) as it saves me from sticking myself and hunting for pins.
Step 1:
The tote I used is 13.5x20.5 inches. Rip or cut lining from your scraps the same size. Lining
is pretty forgiving.
Step 2:
Rip or cut pocket (same or different scrap) three or four inches less in height and width of you tote. If you don't have that big of scrap, cut two half the size and sew them together to make the correct-sized piece.
Step 3 (pocket):
Pin pocket together muted side in like picture below.
 |
| above is the pocket. left is a fold. pin top and right side together with muted fabric inside. leave bottom edge open |
 |
| turn pocket muted-side out and press bottom seam (from above photo) inward so you can make an easy, peasy seam here |
Pin three sides of muted pocket to muted side of lining making sure there is a good allowance at side and bottom edges. Sew pocket to lining leaving top open. Sew over easy, peasy seam at bottom.
 |
| keep pattern consistent. top of pocket at top of photo is open |
Step 5 (lining):
Pin muted sides of lining together. Sew right side seam only. Press. |
| pocket is inside |
step 6 (lining):
Pin muted side of lining to tote with tote design on outside. Sew. Ease lining or tote slightly if not a perfect fit. Press. Pin top of tote where lining meets tote. Sew. Press.
 |
| burlap is right-side out and lining is muted side in. note lining pattern is upside down here and so is the design on the tote |
 |
| pull lining up from bottom opening and push it into the tote. sew around opening of tote again to make sure it is secure |
Step 7: (lining):
Pull out lining slightly. If you pull out the lining, and it seems the bottom seam has already been sewn, you are in the pocket. Press bottom seam together for another easy, peasy seam like the pocket. Sew. Stuff lining into tote.
 |
| here is the second easy, peasy seam like pocket |
 |
| Bottom of lining sewn here. note pattern is consistent. stuff lining into tote |
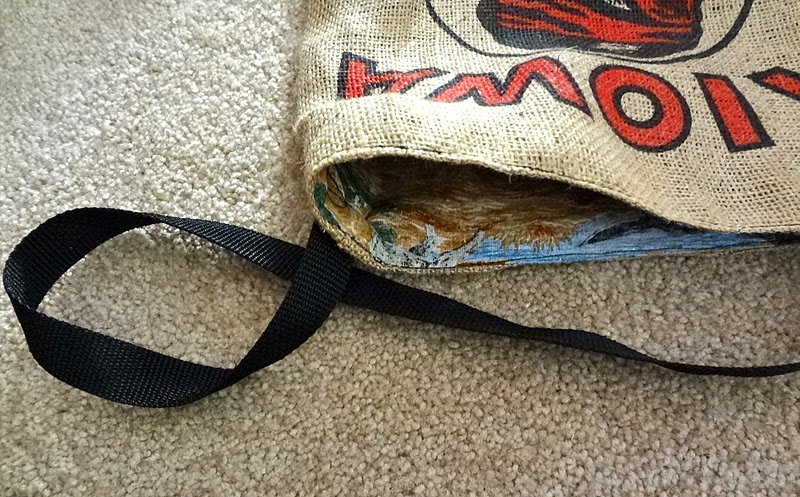
Step 8: (strap):
Attach strap and sew. Careful where you put your straps so that your machine is not sewing through more thicknesses than it can handle. I'm sensitive about this because I sew on a vintage Singer Featherweight (a real workhorse but old). I used belting fabric from Hancock (on sale for $.99 a yard over the weekend - so I got two straps). Make sure to sew straps at ends so they do not unravel.
You're ready to go anywhere, Cowgirl.
Let me know how yours turned out or where I need to make the directions clearer.
Subscribe to:
Posts (Atom)